| 📝Contents |
CUBO Results
After completing a project—whether by using a Template or starting from scratch—you can assign a CUBO™ to a Functional Block. To do this, either right-click the Functional Block and select Select CUBO, or simply click on the Functional Block, which will open the Selected CUBO panel on the right. In this panel, choose See more CUBO options. Using either method will open the CUBO Result page.
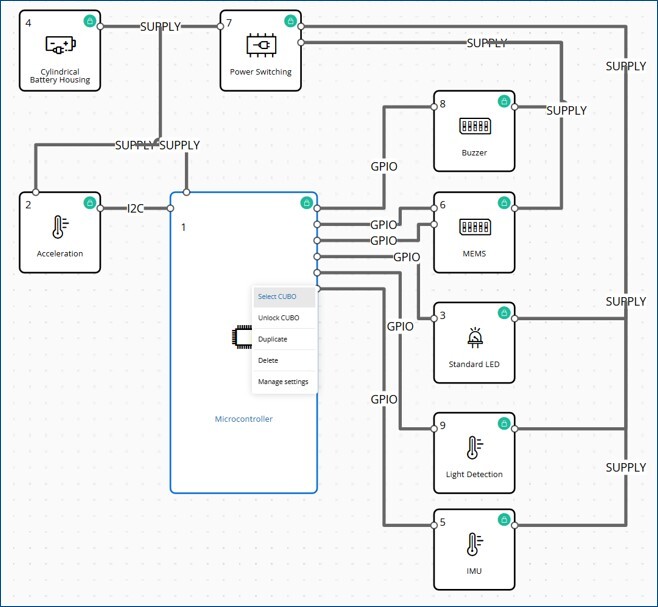
Right click on the Functional block and Select CUBO to go to CUBO Results
See more CUBO options in CUBO Results page
The Select CUBO™ screen displays a list of suitable CUBOs identified by the Design Studio for each Functional Block. You can review each option and select the most appropriate CUBO for your project. On the CUBO Results page of the CELUS Design Platform, you will find a curated list of CUBOs matching your functional block requirements. Each CUBO entry includes key technical and application-specific details, supporting informed and context-aware decision-making.
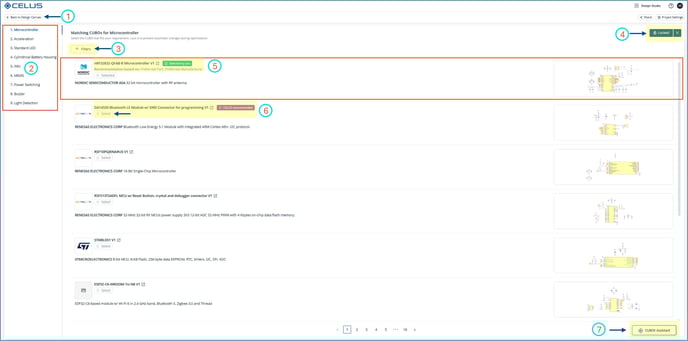
CUBO Results: 1) Back to Design Canvas 2) Functional Blocks Panel 3) CUBO™ Filters 4) Lock the CUBO™ 5) CUBO™ Overview 6) Select the CUBO™ 7) CUBOt AI Assistant
1) Back to Design Canvas
Click the Back to Design Canvas button to return to the Design Canvas
2) Functional Blocks Panel
On the left panel, Functional Blocks from the Design Canvas are listed by name and order. When a block is selected, the result list updates to show the relevant CUBOs, maintaining a one-to-one correspondence with the design hierarchy. The Functional Block menu displays only the ordering number and name of each block, exactly matching the order and names shown on the user's Design Canvas.
Expanded cards display complete summaries along with an enlarged schematic view. The results list is limited to 10 CUBOs per page, with navigation options available to browse additional pages for CUBO selection.
 Functionality Blocks Panel
3) CUBO™ Filters
The CUBO filtering feature allows users to refine matching CUBOs based on functional and technical criteria. Instead of requiring predefined constraints during canvas creation, it enables a structured post-resolve evaluation. This makes the CUBO™ selection process more flexible and efficient.
CUBO™ Filters
How It Works
This filter-first approach complements CELUS's functional-first design capture methodology. Engineers start by defining the system intent using high-level Functional Blocks, and the platform then presents a range of CUBOs that align with those definitions.
Once CUBOs are displayed, filters provide a powerful way to fine-tune results without altering the system architecture or restarting the process. This makes the design exploration iterative and adaptable to evolving requirements.
After resolving a Functional Block on the Design Canvas, CELUS shows a list of matching CUBOs. From this CUBO Results view, users can apply multiple filters to narrow their choices. For example, when searching for LEDs, filters can be set for:
-
Lighting color
-
Peak wavelength
-
Viewing angle
Filters can also be combined, allowing engineers to quickly pinpoint the most suitable CUBOs for their design needs, all without restarting the resolution process
4) Select the CUBO™
Selecting a CUBO™ means choosing an initial solution from the list of options that fit your functional block’s requirements. This step allows you to review and pick the best match for your project from the suggested CUBOs. Your selection is not final, you can change it later if you find a better fit or if your project requirements change. The selection remains flexible and can be updated as your project evolves. If you resolve or update the project, the selection might change based on change in constraints.

CUBO™ selected
5) Lock the CUBO™
Locking a CUBO™ makes your choice permanent, even if you update or resolve the project. If the CUBO™’s requirements, such as Functionality or Specifications, or the interfaces to its Functional Block change, and the locked CUBO™ no longer meets the constraints, resolving the project will result in an error.
If you encounter an error, you must either unlock the CUBO™ or adjust your requirements to resolve the project successfully. You can unlock the CUBO™ from the Select CUBO page or directly in the Design Canvas.
Locking Mechanism:
-
Users may lock only one CUBO per functional block.
-
Once a CUBO is locked, selection buttons for other CUBOs are disabled until the locked one is manually unlocked.
- The Lock Selection button stays fixed at the top and changes to Selection Locked, displaying an unlock (X) icon as shown in the GIF below.
Lock and Unlock the CUBO™ selection from CUBO Results page

Locked CUBO™ view from Design Canvas
Important: Without locking, the CUBO™ will not be set as the final solution. Locking the CUBO™ ensures that the same CUBO™ is used throughout the project, similar to how Featured Projects are structured.
6) CUBO™ Overview
When you select a Functional Block, the system displays a list of CUBOs that match the Functionality. Clicking on a CUBO™ gives you an overview, including Specifications linked to that CUBO™, and its associated Schematic.
CUBO™ Overview: Shows CUBOs,associated specifications and Schematics
In the CUBO Results page, the platform displays a list of CUBOs that best fit your project based on:
-
The functions and their related specifications
-
The interfaces connected to Functional Blocks
-
The specifications of those ports
Each CUBO™ result card includes:
-
Manufacturer logo, MPN (linked to full CUBO view), and a brief summary
-
Selection status (e.g., CELUS recommended or Selected by you)
-
Schematic preview with expandable detail
-
A Select button (or Selected/Locked status)
Exploring CUBOs in Detail
See comprehensive details about the selected CUBO™
Each CUBO™ listed in the matched CUBO™ results page includes a View CUBO™ button. Clicking this button opens a new browser tab with comprehensive details about the selected CUBO™.
The first page provides:
-
A description of the CUBO™
-
The CUBO™ specifications
-
A schematic preview of the CUBO™
-
Access to the CUBOt AI Assistant
Each CUBO™ includes four main tabs:
-
Specifications: Displays all technical attributes.
-
CUBO™ BOM: Shows the Bill of Materials.
-
Additional Documents: Provides datasheets and supporting files.
-
Ports: Lists the input/output connections for integration.
For more information, refer to What is a CUBO™?
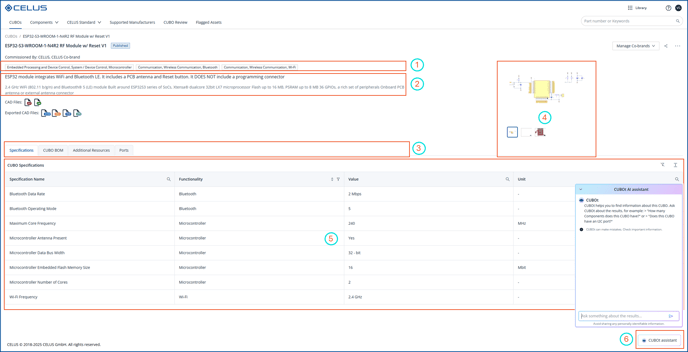
CUBO™ View: 1) Hierarchy of Functionality 2) CUBO™ description 3) Schematic and Layout Preview 4) Navigation tabs - CUBO™ Specifications, CUBO™ BOM, CUBO™ Additional Documents, CUBO™ Ports 5) Specification associated to Functionalities 6) CUBOt AI Assistant
7) CUBOt AI Assistant
-
CUBOt: General questions related to CELUS Platform can be asked here
-
CUBO Expert: Assists you in CUBO™ comparison,their specifications,interfaces associated to CUBOs
-
Component Expert: Assists with questions about the components used within your CUBO™ or project.
You can switch between the CUBOt experts using the dropdown menu, as shown in the GIF below.
 CUBOt AI Assistant: Select the CUBOt expert, CUBO Expert, Component Expert
Stay informed—see all our latest articles and updates on the Home Page.